


The best camera there is, is the one you have. You always have your phone with you but you may not always have a professional camera with you. The good news is, you don’t need a professional camera to take great images, you just need to master a few little tricks. There are several key factors that can really help you take better iPhone photos!
Lighting is Key | Indoor Lighting
Natural light is BEST! Open up those curtains and let the light in. Ideally you want your subject to be facing the window to get even light across their face.
If there is a lot of direct sunlight coming through the window and you see sun hot spots on the floor, make sure your subject is backed up outside of that hot spot but still facing the window. OR, if you have a sheer curtain, just close that curtain up. It will help diffuse the light to get that soft even light across their face.
Lighting is Key | Outdoor Lighting
Do you struggle with squinty photos and harsh shadows? Fixing this is SUPER easy. The general rule of thumb is to have your subject stand so that they can see their shadow in front of them. I like to refer to this as peter pan light because he is always chasing his shadow.
With the subjects shadow being in front of them, they are backlit by the sun. They are no longer squinting and there are no harsh shadows creating dark under eyes. This allows for softer, even light across the subjects face.
Look for open shade. Open shade is shade that is created by a building, tree, or other large object. When the subject looks up, there is nothing over top of them but open sky. This is going to be the BEST light for outdoor images. They will be clear and crisp, and you won’t have squinty eyes or harsh shadows under the eyes.

Shade your phone
One thing that can happen when you backlight a subject in an open space on a sunny day is something called sun flare. Because your camera will be facing the sun directly, there is a chance that you will notice some sun streaks or circles in your image. The image may also appear hazy. To avoid this, hold your other hand over top and slightly in front of the phone to shade the camera lens. This will prevent any sun flare and help get that crisp image.

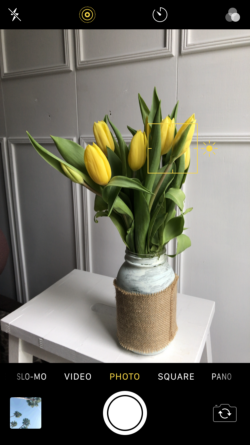
Focusing
Before clicking that shutter button, you want to make sure your subject is in focus. Simply tap the screen in the spot you would like it to focus on. Once you’ve focused on your subject, you can click that shutter button and take your image!
Avoid Zooming In
If possible, try to avoid zooming in using the app. When you zoom in to take an image, you do lose a little bit of quality in the image as it becomes more pixelated and blurry. Instead move your whole body closer to the subject to take the image. This will help keep your iPhone photos as clear and crisp as possible.
Avoid Using Flash
I don’t think I have ever used the flash feature on my iPhone… Typically you want to avoid a direct flash of light at the subject. During the day, make use of the natural light available. At night I honestly prefer images with the lighting available as opposed to the direct flash on the subject. Often times when a direct flash is used on a subject, the subject can appear over exposed or washed out, but the background will be very dark. So definitely try to avoid flash when you can. You can make sure it is set to “off” by clicking on the little lightning bolt at the top left of the screen in the camera app.

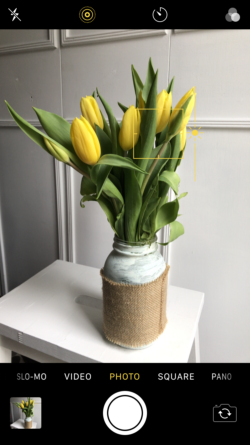
Getting Brighter Images
There is an option to take brighter photos right from the camera app, but I usually suggest making sure the exposure is perfect and then brightening the image afterwards when editing it.
If you want to get a brighter image right from the camera, the iPhone allows this capability! When you tap on the screen to focus, you’ll notice the square that shows up and a little sun beside it on the right. You can then slide the sun up or down to adjust the brightness of the image.
I hope these tips have helped you take better iPhone photos! Let me know if there is anything else you’d like to learn in the comments below!


+ COMMENTS
add a comment